
Ultimate Guide to Dating Photo Composition
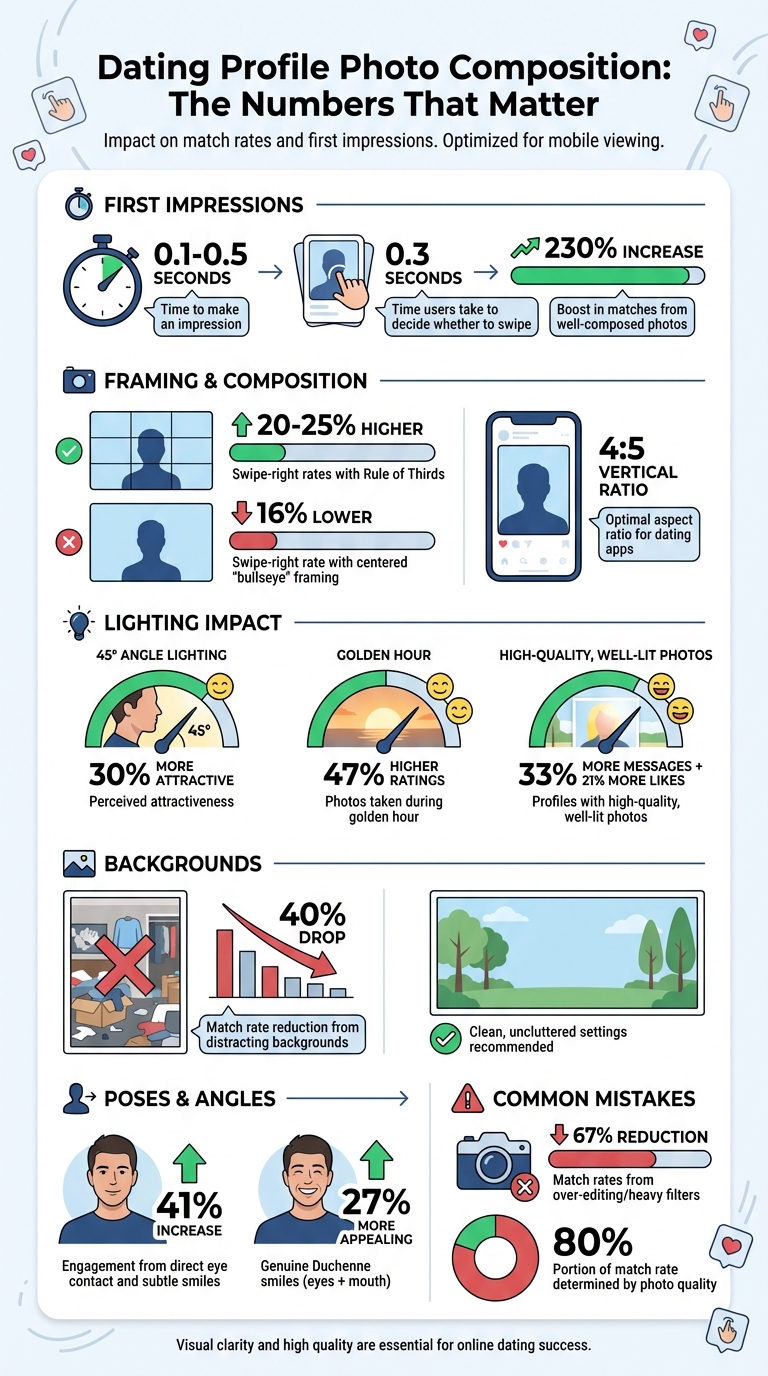
Your dating profile photo has only 0.1–0.5 seconds to make an impression. Research shows that well-composed photos can boost matches by 230%, while poor-quality images lead to fewer swipes. Here’s what matters most:
- Framing: Off-center compositions using the Rule of Thirds increase swipe-right rates by 20–25%.
- Lighting: Soft, even lighting at a 45° angle can make you appear 30% more attractive. Golden hour photos get 47% higher ratings.
- Backgrounds: Clean, uncluttered settings can prevent a 40% drop in match rates caused by distractions.
- Poses & Angles: Slightly turned angles, relaxed poses, and direct eye contact increase engagement by up to 41%.
- Mistakes to Avoid: Over-editing can cut match rates by 67%, and poorly cropped or dimly lit photos hurt first impressions.
Tools like Dating Photo AI simplify the process by optimizing your photos for lighting, composition, and backgrounds, saving time and effort. Whether you DIY or use AI, focus on clear, flattering photos that highlight your best features naturally.
Dating Profile Photo Statistics: Impact of Composition on Match Rates
How to Take a Perfect Dating App Photo (Step-by-Step Guide)
How to Frame Your Dating Profile Photos
Framing is all about guiding the viewer's eye directly to you, not the background. Considering that people process a dating photo in less than 0.1 seconds, clear and thoughtful framing makes it easier for viewers to focus on what matters most - you. Below are some key techniques to ensure your profile photo grabs attention.
Centered vs. Off-Center Positioning
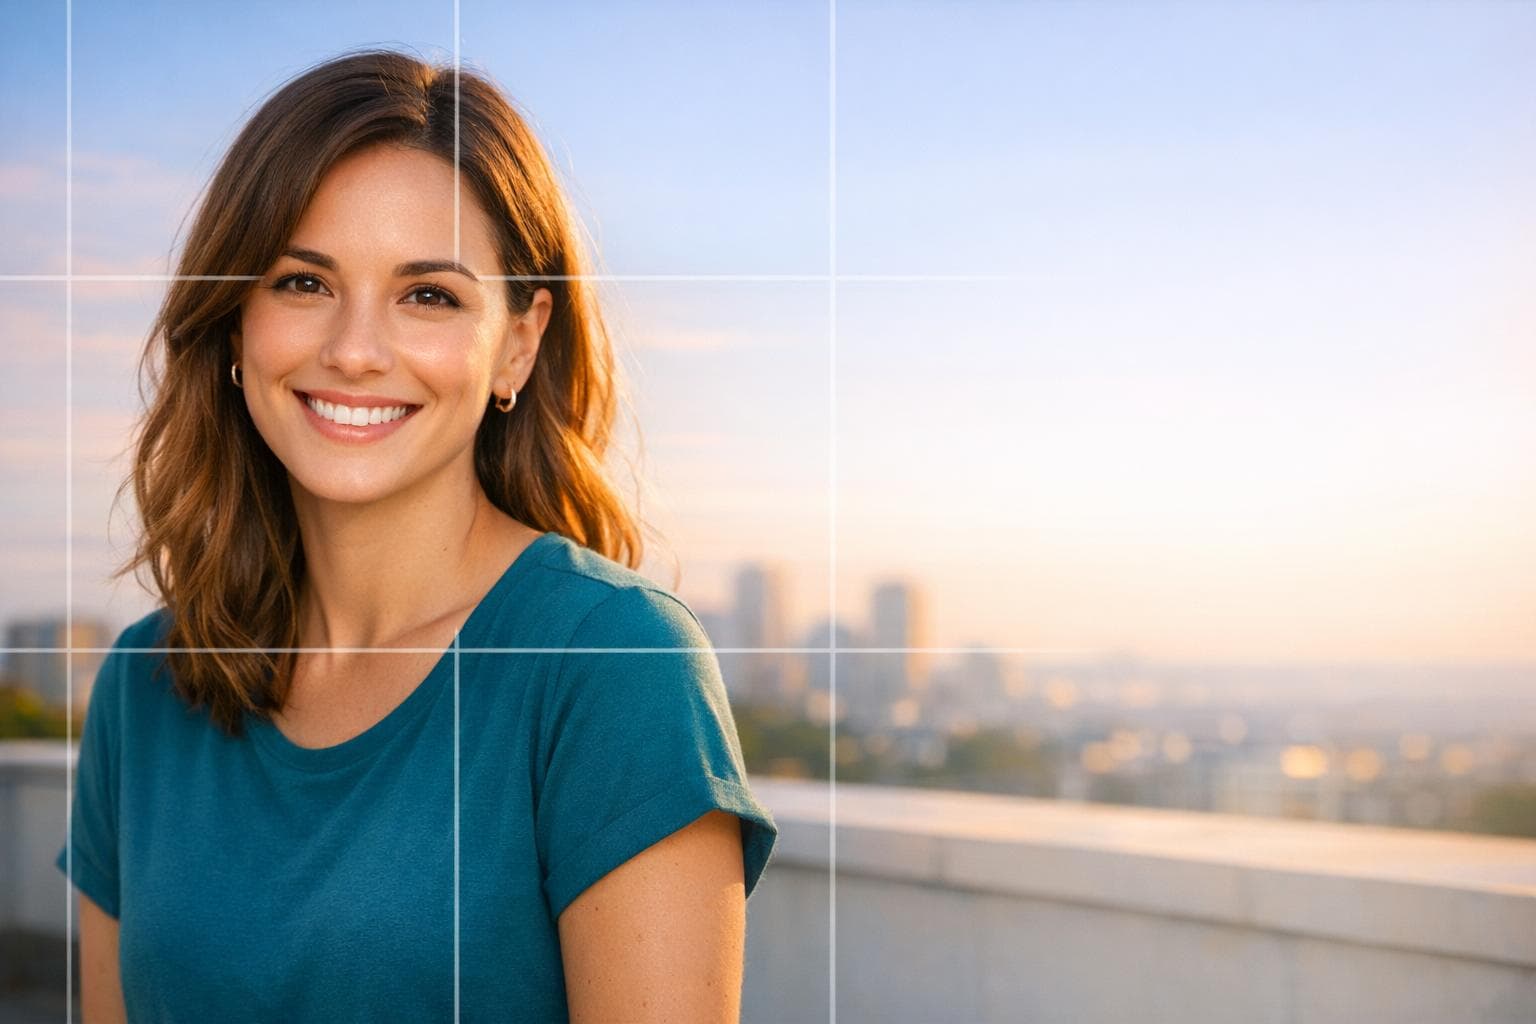
A perfectly centered face can sometimes feel too static. Research actually shows that "bullseye framing" leads to a 16% lower swipe-right rate compared to photos with off-center compositions[1]. The solution? Use your camera's grid overlay and align your eyes with the top horizontal line or one of the four "power points" where the grid lines intersect. This approach, known as the Rule of Thirds, creates a balanced and visually engaging photo.
While centered framing can work if your lighting and expression are spot-on, off-center positioning often feels more dynamic. Leaving extra space in the direction you're facing (instead of behind you) makes the composition feel more deliberate. For dating apps like Tinder, cropping your photo to a 4:5 vertical ratio ensures it fills the screen effectively[6].
Adding Depth with Foreground and Background Elements
Flat images can easily get lost in a sea of profile photos. Adding depth helps you stand out by creating a sense of dimension and visual interest. To achieve this, try using Portrait Mode with an aperture setting between f/2.8 and f/4, and position yourself several feet away from the background for a layered effect[9][6].
Foreground elements can also enhance your photo. Holding a coffee cup, standing in a doorway, or even shooting through tree branches can naturally frame your face. Background features like pathways, railings, or architectural lines serve as "leading lines", subtly guiding the viewer’s focus to you[9][2]. One important tip: avoid letting the horizon line cut across your neck - it can create an unflattering "decapitation" effect. Instead, keep the horizon line in the upper or lower third of the frame for better composition[1]. If your face doesn’t stand out clearly when you squint at the photo, it’s time to adjust the framing.
Nailing your framing is just the beginning - next up, we’ll dive into the role of lighting in perfecting your dating profile photos.
Lighting Tips for Better Dating Photos
Lighting plays a huge role in how others perceive you in photos. It's not just about brightness - it’s about how the light interacts with your face. Soft, even lighting makes it easier for the brain to process your features, leading to quicker and more favorable impressions. Here's a fascinating stat: adjusting your lighting from overhead to a 45-degree angle can increase perceived attractiveness by 30%[11]. Considering that dating app users form opinions in under 0.4 seconds[10], this small tweak can make a big difference.
The science behind this is clear. Lighting at a 45-degree angle enhances the natural contours of your face and boosts symmetry, both of which are key factors in how we judge attractiveness. Warm lighting in the 3,000–4,500 K range also reflects red wavelengths, giving your skin a healthier, more inviting glow. On the other hand, harsh overhead lighting can create "raccoon eyes" and highlight wrinkles, making you appear tired or less approachable.
Using Natural Light: Timing and Position
The golden hour, which occurs during the hour after sunrise or before sunset, offers the most flattering natural light. During this time, the sun sits low on the horizon, casting a soft, warm glow that minimizes shadows and enhances skin tones. If you’re taking photos outdoors, face the light source to take full advantage of this effect. Fun fact: photos taken during golden hour receive 47% higher ratings than those lit by harsh fluorescent light[13].
If golden hour isn’t an option, an overcast day is your next best friend. The clouds act like a natural diffuser, spreading sunlight evenly and eliminating harsh shadows. However, avoid shooting during mid-morning to mid-afternoon when the sun is directly overhead; this creates unflattering shadows under your eyes and chin, which can make you look tired or grumpy.
For indoor natural light, position yourself 2–4 feet from a window with indirect light. Facing the window will give you soft, diffused lighting that smooths out skin texture. North- or east-facing windows are particularly effective, as they provide a near-perfect Color Rendering Index (CRI) of 98, which captures skin tones beautifully[11]. If one side of your face still appears shadowed, use a piece of white posterboard to reflect light back onto the darker areas.
When natural light isn’t available, you can still create great results with a simple artificial lighting setup.
Indoor Lighting: Basic Setup Guide
No natural light? No problem. A basic artificial lighting setup can give you professional-looking results with minimal effort. Start with an 18-inch ring light positioned slightly above eye level and angled down at about 15 degrees. This setup creates flattering "catch-lights" in your eyes, making them look bright and engaging. Set the color temperature between 3,200–4,500 K to achieve warm, natural-looking skin tones[11].
Avoid standing directly under ceiling lights. Overhead lighting tends to exaggerate shadows around your eyes and nose, which can be unflattering. Instead, use lamps placed at or slightly above face level. If the light is too harsh, drape a white sheet or pillowcase over the lamp to diffuse it. Also, be mindful of mixing different light temperatures, like warm yellow bulbs and cool blue daylight. This can confuse your camera’s white balance and make your skin tone look unnatural.
If you’re ready to invest in gear, a basic ring light costs about $20–$40[14]. For even better results, consider a 24-inch softbox placed at a 45-degree angle and slightly above eye level to mimic natural window lighting. For darker skin tones, a "clamshell" setup with two LED panels at 45-degree angles provides balanced lighting that enhances depth and dimension. And here’s the payoff: profiles with high-quality, well-lit photos see up to 33% more messages and 21% more likes compared to those with poor lighting[9]. Once your lighting is on point, the next step is choosing the perfect background to complement your look.
Selecting Backgrounds That Work
Your background plays a big role in shaping how others perceive your profile. The right setting keeps the spotlight on you while subtly hinting at your lifestyle and interests. On the flip side, a poorly chosen background can hurt your chances - AI analysis reveals that distracting backgrounds can slash match rates by up to 40% [4]. So, picking the right backdrop isn’t just a detail - it’s a game-changer.
Why Clean Backgrounds Matter
A clean, uncluttered background ensures that all the attention stays on you. Messy or chaotic spaces can send the wrong message, making it seem like you didn’t put much effort into your profile.
"A busy, cluttered background is distracting. It takes the focus away from you, the subject." – AttractivenessAI [3]
Stick to simple options like monochrome walls, exposed brick, or natural settings like parks and beaches. These create a calm, balanced look without stealing the spotlight. On the other hand, avoid bathroom selfies, messy bedrooms, car interiors, or any space that looks cluttered. Small details matter - double-check for things like visible trash cans, toiletries, or anything that might distract from the overall image. If you’re indoors, a tidy bookshelf or a well-lit home office can work wonders. For outdoor shots, aim for open spaces with soft, complementary colors that enhance your overall vibe.
Using Backgrounds That Show Your Personality
Once you’ve nailed the clean and tidy look, it’s time to add a little personality. The trick is to choose a setting that reflects your interests but doesn’t overpower the photo. A cozy cafe, a scenic park, or an artistic backdrop can subtly showcase your personality without taking the focus off you.
Think about what matches your style. If you’re into fitness, a serene outdoor park is a better choice than a crowded gym. Love coffee culture? Opt for a well-lit cafe corner instead of a busy counter. And if you’re a homebody, a cozy reading nook with a neat bookshelf says more about you than a cluttered living room. Architectural elements like clean brick walls or railings can also act as “leading lines” that naturally draw attention to you. And don’t forget to think about contrast - wear colors that stand out against your background. For example, a red shirt against a neutral wall or green trees will make you pop in the app’s grid view.
Once your background is perfect, the next step is to focus on natural poses and camera angles to create a profile that truly stands out.
sbb-itb-06ba92c
Posing and Camera Angles That Look Natural
Once you’ve nailed your composition and lighting, natural posing can take your profile photos to the next level. The way you present yourself in a photo often determines whether someone pauses to learn more about you - or keeps scrolling. Since the brain forms an impression of attractiveness in less than 100 milliseconds [12], stiff or awkward poses can work against you. Fortunately, you don’t need to be naturally photogenic to make a great impression - just a few simple techniques can make all the difference.
Discovering Your Most Flattering Angles
You don’t need a professional photoshoot to find your best angles - just a little trial and error. Start with the 45° rule: slightly turn your face 45° away from the camera. This small adjustment adds depth to your features and avoids the flattening effect of a straight-on photo, which can make your face appear wider [18].
Camera height also plays a big role. Position the camera about 15–20° above eye level. This angle naturally lifts your face and reduces the chance of a double chin [18]. For full-body shots, turning your shoulders or hips at a three-quarter angle creates a slimming and dynamic look [10]. Want to define your jawline further? Try the "turtle" technique: gently push your forehead toward the camera while tilting your chin down about 10°. This trick smooths out neck folds and highlights your jawline [18].
Struggling to figure out your angles? Record a short video of yourself moving naturally, then pull still frames from it [17]. Also, keep the camera at least an arm’s length away (12–16 inches) to avoid the distortions that wide-angle lenses can create, like exaggerating the size of your nose [18].
Once you’ve identified your best angles, the next step is to master natural, relaxed posing.
How to Pose Without Looking Stiff
Static, overly staged poses can feel awkward and look unnatural. Instead, add small movements - like walking, adjusting an accessory, or tilting your head slightly - to create candid, effortless moments [15].
"The best pose is the one that looks like it wasn’t posed." – SwipeTogether Editorial Team [10]
Keep your arms loose and visible to project approachability. If you’re unsure what to do with your hands, give them a task: hold a coffee cup, tuck one hand casually into your pocket, or brush a strand of hair away from your face [15]. For your lower body, avoid locking your knees. Shift your weight to one hip or bend a knee slightly to create a more relaxed and natural stance.
Your facial expression is just as important. Avoid a wide-eyed, startled look by using a slight squinch - tighten your lower eyelids just a bit to add focus and confidence [16]. For a natural smile, skip the forced “say cheese” grin. Instead, think of something funny or say a word ending in an “ah” sound, like “yoga,” to create a more relaxed expression. A genuine Duchenne smile, which engages both your mouth and eyes, is 27% more appealing than a smile that only uses your mouth [13].
For a quick confidence boost before your photos, try a 60-second power pose: stand tall with your hands on your hips and your chin slightly raised. This simple exercise can lower stress hormones and increase feelings of self-assurance [16].
Direct eye contact is another powerful tool. Photos with direct eye contact and subtle smiles can increase right-swipes by 41% [10]. To achieve this, look directly at the camera lens - not your screen - to create an instant sense of connection and trust [10].
Photo Composition Mistakes to Avoid
Even with ideal lighting and natural poses - covered earlier in framing and lighting tips - small composition mistakes can still hurt your chances of making a strong impression. Users decide whether to swipe in just 0.3 seconds based on your primary photo [8]. That means even minor errors can have a big impact. Below are some common pitfalls that can take away from an otherwise great photo.
The Problem with Too Much Editing
Over-editing your photos can lead to the "uncanny valley" effect, where your picture looks almost real but feels unsettling [20]. Think about those overly smooth, poreless faces - while they might seem polished, they actually raise red flags. In fact, heavily filtered photos can reduce match rates by up to 67% [8]. The more obvious the filter, the less trustworthy your profile appears [19].
There’s a fine line between enhancing your photo and misrepresenting yourself. Enhancements like good lighting and flattering angles show you at your best, while drastic edits that change your features cross into deception [20][6]. This distinction is especially important because trustworthiness is a key factor for women deciding whether to meet someone [19].
Instead of relying on heavy filters, aim for natural lighting. Shooting during Golden Hour - the hour right after sunrise or before sunset - provides soft, flattering light that minimizes the need for any major edits [6][7]. If adjustments are necessary, stick to simple tweaks like adjusting brightness or contrast, and avoid tools that alter your facial features.
Getting Cropping and Aspect Ratios Right
Cropping mistakes can easily ruin a great photo. Using the Rule of Thirds to position yourself off-center creates a more dynamic and engaging composition compared to static, centered shots. Be cautious of "visual decapitation", which happens when the horizon line cuts awkwardly through your neck - it’s distracting and unflattering [1]. Similarly, avoid cropping too tightly at the top of your head or leaving too much empty space above, as both can throw off the balance of your photo [1][6].
Aspect ratio plays a bigger role than you might realize. Horizontal (landscape) photos often get cropped awkwardly by dating apps, cutting out key parts of the image [6]. To avoid this, shoot in a 4:3 ratio or crop to a 4:5 vertical format. This ensures your photo fills the screen properly and looks great on mobile devices. For travel or activity photos, crop tightly enough to keep your face as the focal point [19].
By steering clear of these common errors, you can create a strong foundation for enhancing your photos further with tools like Dating Photo AI.
| Mistake | Impact | Quick Fix |
|---|---|---|
| Centered framing | –16% swipe-right rate [1] | Use Rule of Thirds positioning |
| Heavy filters | –67% match rate [8] | Use natural Golden Hour lighting |
| Horizon through neck | Visual decapitation [1] | Position horizon in top/bottom third |
| Horizontal photos | Awkward auto-cropping [6] | Shoot 4:3 or crop to 4:5 vertical |
Using Dating Photo AI to Improve Your Photos
Dating Photo AI takes the guesswork out of achieving professional-quality profile pictures. By applying proven techniques like framing and lighting, it transforms your photos into polished images effortlessly. If you’re familiar with the basics of composition but dread the expense or logistics of a professional photoshoot, this tool offers a practical, budget-friendly alternative.
Here’s how it works and why it’s worth considering.
The Dating Photo AI Process
Getting started is simple. All you need to do is upload 5–20 selfies that show a variety of angles, expressions, and lighting conditions [20]. The more diverse your uploads - ranging from full-face shots to side profiles, smiles to more neutral looks - the better the AI can capture your unique features.
In just 10 minutes to 3 hours, the AI processes your photos, analyzing facial details to create images that feel natural and unposed - perfect for dating apps. It places your likeness into carefully curated settings like rooftop cafes, serene beaches at sunset, or bustling city streets. This eliminates the need for a traditional photoshoot while delivering photos that look like they were snapped by a friend on your best day.
The generated images are high-resolution and optimized with professional techniques like the Rule of Thirds, natural lighting, and realistic skin textures. Shadows and expressions are rendered to appear organic and lifelike, enhancing the authenticity of the final result [20].
"The goal isn't to become a different person. It's to get dating profile pictures that look like they were taken by a talented friend on a day you were feeling your absolute best." – Alexander Liebisch, TinderProfile.ai [20]
This seamless process delivers professional-quality photos while keeping things real, leaving you ready to explore the service’s tailored plans.
Why Choose Dating Photo AI
Dating Photo AI offers three flexible plans designed to meet different needs: Starter (40 photos), Dater (80 photos), and Casanova (unlimited photos with custom prompts). These options provide a budget-friendly alternative to traditional photoshoots, which can cost anywhere from $500 to $2,000 [22]. Plus, the service includes a satisfaction guarantee, addressing concerns about overly edited or unnatural results [5].
Research backs up the impact of well-composed photos: around 80% of a user’s match rate on dating apps comes down to photo quality [21]. Users of Dating Photo AI have reported an average of 8x more right swipes [20]. With its quick turnaround and a variety of settings that showcase your personality - whether adventurous, laid-back, or professional - this tool makes it easy to create a complete and engaging profile without the stress of organizing a photoshoot.
Conclusion
Great dating profile photos aren’t about chasing perfection - they’re about showcasing presence and genuineness. The composition techniques we’ve explored, like the Rule of Thirds, natural lighting, and clean backgrounds, help highlight your personality in the best way possible. When potential matches make snap judgments in under 0.4 seconds [10], these small details can be the difference between being overlooked and sparking a meaningful connection.
The numbers back it up: photos that follow the Rule of Thirds get 20-25% more right swipes compared to centered shots [1], and profiles with well-optimized images can see a 230% increase in matches [4]. But statistics only matter if your photos still feel like you. As Ava Reynolds, an Attraction Psychology Researcher, explains: "The strongest dating photos don't sell perfection - they sell presence. Eye contact, confidence, and storytelling matter far more than looks" [10].
While mastering these techniques takes time, you don’t have to go it alone. Dating Photo AI simplifies the process by automatically applying these principles - placing your features at ideal grid points, enhancing lighting, and choosing settings that reflect your personality. The result? A photo gallery that’s polished yet feels natural, not forced or artificial.
Whether you decide to fine-tune your photography skills or let AI lend a hand, the mission stays the same: creating photos that reflect your most authentic self. Start with the basics - good lighting, thoughtful composition, and a genuine expression - and you’ll create a profile that draws the right matches for all the right reasons.
FAQs
What’s the best first photo for my dating profile?
The ideal first photo for your profile is a high-quality solo portrait that puts the spotlight on you without any distractions. A clear headshot that prominently features your face can greatly increase your chances of receiving more likes and messages. To make your photo stand out, use smart composition techniques like the Rule of Thirds, ensure the lighting is flattering, and project confidence with a natural, relaxed expression. These small adjustments can make your profile appear more inviting and approachable.
How can I get flattering lighting without golden hour?
You don’t need golden hour to capture great lighting. The trick is to use soft, natural light to your advantage. Try standing by a window during the day - this gives you diffused light that softens shadows and highlights your skin tone beautifully.
If you’re outside, aim for shaded spots or wait for an overcast sky. These conditions work wonders by evening out the light and avoiding harsh contrasts. Steer clear of direct sunlight, especially around midday, as it can create unflattering, sharp shadows.
To step up your composition, use your phone's grid overlay and follow the rule of thirds. This simple technique can help you frame your shot for a balanced and visually pleasing result.
How do I use Dating Photo AI without looking fake?
To make your Dating Photo AI images feel real and relatable, aim for photos that showcase your natural self. Steer clear of heavy editing or effects that might come across as fake or misleading.
Choose photos with natural expressions, flattering lighting, and small imperfections - they add to the charm and authenticity. Staying true to your actual appearance helps your images come across as honest and approachable.